
Customizing Nintendo Switch for kids
Nintendo's family-friendly console can be adapted for both young and old in the household. Get an overview of playtime and set various restrictions with your smartphone or directly on your console.


Choose language in the Google-box below. Some translations may be flawed or inaccurate.
Safer settings in Nintendo Switch
Nintendo Switch has become a popular gaming console among many children nationwide. It’s portable and easy to travel with and can be connected to TVs and other larger screens whenever desired.
With nice titles like Super Mario Odyssey, Splatoon 2, Mario Kart, Snipperclips, and Zelda, there are plenty of quality games offered. But these are not exempt from age recommendations, and therefore it may make sense to customize the console to suit everyone in the household.
(Review i Norwegian: Super Mario Odyssey, Splatoon 2, Mario Kart, Snipperclips, and Zelda.)
Keep track of your phone
Nintendo has its own parental control app that is free to download. This one is called Nintendo Switch Parental Control.
Here you can set up alerts and restrictions for playtime, and choose age limits and limit chat. Note that both your console and smartphone must be connected to the internet for this to work optimally.
- Open the app
- Log in to an account that matches the one you use on your Switch console, or sign up for a new account (you must be over 18 to use the app)
- Choose Next from the menu
To connect the app to your console, you must have both devices close to each other. On your console:
- Enter Settings (gear in the main menu) inside the Switch console
- Select Parental Controls and Parental Controls Settings
- Select Set Up with Smart Device
- Click Yes that you’ve installed the app on your mobile or tablet
- Find The Registration Code that pops up in the app. You’ll need to type it into your Switch console
- Click Link
- Your smartphone and console are now connected
You’ll now get the main menu in the app that shows how long your child has been playing on the console.

Select a PIN
Inside the app, you can select a PIN that allows you to temporarily lift all restrictions on the Switch console itself.
To set up a PIN:
- Open the app
- Select the Console Settings icon that is in the lower-right corner
- Select PIN
Enable parental control directly on the console
For various reasons, it may be a good idea to enable parental controls directly on your Switch console instead of controlling your device from a mobile. Among other things, it’ll not make you dependent on the contact between mobile and Switch console (internet access) to adjust settings later.
- Go to Settings (gear in the main menu) inside the Switch console
- SelectParental Controls and Parental Controls Settings
- Press the X button to select that you do not have a smart device
- Select Set Up with This Console
- Adjust the settings you want by defined age groups, or make your own choices
- Select Next
- Enter a PIN that only you know
Create a separate account for the kids
You can also create a separate account for the children who are added under you as a guardian. This is done on Nintendo’s own website.
- Log in to the link above with your username and password
- Select Family Group
- Select Add Member
- Select Create an Account for A Child
- Fill in your age, username, gender, and password information
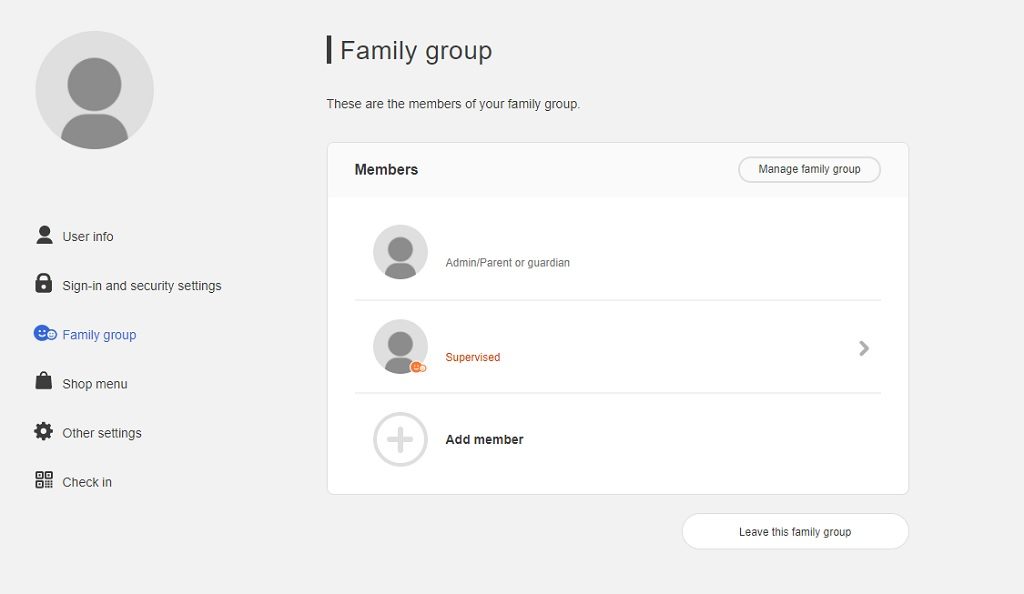
The advantage of the children having their own user account is that they do not have to enter the email address themselves, and one can set up one’s own restrictions for purchases in the console’s online store. These adjustments are made on the website’s homepage (see further down in the article).
To add your child’s account to your Switch console:
- Access System Settings
- Select User
- Select Add User
- Select Create New User
- Create an icon and nickname
- Select Sign in and Link
- Enter your child’s username and password
By having multiple accounts on the console, children can also play the same game with their own user. You can also create a Local User on the device:
- Access System Settings
- Select User
- Select Add User
Fill in the information and you’ll have a new user that you can choose each time you start a game.
Set game time limits
This is only possible to control if you have the app:
- Open the app
- Select the console settings icon that is in the lower-right corner
- Enter Play-Time Limit
- Here you can set limits on playing time for each day, and optionally set up a time for when the screen will be turned off for the evening
- Click «Suspend Software» check This prevents children from playing on/starting new games when the time has been spent
A digital countdown will appear on the console so that children will also get an overview of how much play time is left.
Adjust age limits
You can choose age limits for games so that your kids can’t buy and download games with a high age limit.
From the app:
- Open the app
- Select the console settings icon that is in the lower-right corner
- Select Restriction Level
- Here one can choose Teen, Pre-teen, Child, or Custom Setting
- The latter allows you to choose which age recommendations apply to your child
On the Switch console:
- Enter Settings (gear in the main menu) inside the Switch console
- Select Parental Controls and Change Settings
- Enter your PIN
- Select Change Settings
- Choose Restriction Level
- Here one can choose Teen, Pre-teen, Child, or Custom Setting
- The latter allows you to choose which age recommendations apply to your child
Turning off in-game chat
Many children find it nice to meet others to be social in games. At the same time, for various reasons it may be desirable for parents to turn off chat opportunities in games. Note that this doesn’t always remove/turn off built-in in-game chat capabilities, such as Fortnite.
From the app:
- Open the app
- Select the console settings icon that is in the lower-right corner
- Select Restriction Level
- On Child, game chat is limited automatically, or you can choose your own Custom Setting and choose your own settings
- Here you can also turn off the use of VR and social media publishing
On the Switch console:
- Enter Settings (gear in the main menu) inside the Switch console
- Select Parental Controls and Change Settings
- Enter your PIN
- Select Change Settings
- Select Restriction Level
- On Child, game chat is limited automatically, or you can choose your own Custom Setting and choose your own settings
- Here you can also turn off the use of VR and social media publishing
It is also possible to turn off friend suggestions so that your child is not suggested as a friend to others:
- Log in to Nintendo’s website
- Access your child’s user
- Select Other Settings
- Select change on Friend Suggestions
Ways to buy games (on console)
To avoid unpleasant expenditure, you may want to set up restrictions so that your kids can’t purchase games and content in games without your permission.
There are three options for buying games.
- Credit card
- Nintendo eShop card (purchased at external retailers)
- PayPal
As a parent, you can also top up a digital wallet that you can use to buy games with. Children still need to ask parents for permission before purchasing content, and parents must enter passwords:
- Log in to Nintendo’s website
- Enter the shop menu
- Select Add Funds
Limit in-game purchase
For credit cards, you can choose not to click «save card information». Then all information must be entered every time. Together with a secure password for login and bank card information that only the adult knows, one can prevent the children from acting without permission.
You can also change your password and purchase settings in your online store. Here’s what you do on your Switch console:
- Go to Settings
- Select user
- Select your username
- Select Nintendo eShop settings
- Login
- Go down to Password Entry Settings and select Change
Here you can choose whether you have to enter a password every time the Nintendo eShop is opened and whether you need to enter a password for purchase if credit card information is stored on the device.
You can also limit in-game purchases on your child’s account (this is ‘on’ by default if your child’s user is under the age of 15.)
- Log in to Nintendo’s website
- Access your child’s user
- Select Spending/Purchases on Nintendo Switch eShop and nintendo.com
- Note that the check box is checked
For reflection
Please note that no restrictions and settings are 100 percent secure. Children and adolescents can still experience unpleasant events, even in games that have a lower age limit.
Consider game chat, for example, and in communication with friends. Challenges may always arise as long as you have access to a game console, computer, or mobile phone.
Setting screen time limits won’t resolve screen time disagreements, or your kids might want to log in at a completely different time than planned if friends are to play together at a set time. Parental settings can be useful, but only as a shield and aid.
It will never be able to replace dialogue at home and creative solutions that will help children’s digital lives go around. And no parental setting can replace the presence of a confident adult who engages and cares.
Read more about parental controls on Nintendo’s website.
Illustration photo: Wachiwit / Shutterstock.com
(Written on 14 January 2021. Translated from Norwegian to English on 20 October 2021 by Ratan.)
![]()
Utviklet som en del av Erasmus+ prosjektet «TeachingTools».
-
Relaterte artikler

Is it okay that your child talk to artificial intelligence?
Children encounter artificial intelligence in apps, toys, websites, and at school. Artificial intelligence entails some risks for children but can also be very useful.
Publisert
Norwegian children and their phones and apps
Are you an immigrant? Almost all Norwegian children between 9 and 11 years old have their own mobile phones. If you have moved to Norway, you may come from a country where it is common for children to be much older before they get their own phone.
Publisert
Game for children and parents: Licence to use phone
Use this playful exercise created to help children learn more about mobile phone usage and become aware of making smart choices – whether they already have their own mobile phone or desire one.
Publisert Bestill foredrag